Phone:
(701)814-6992
Physical address:
6296 Donnelly Plaza
Ratkeville, Bahamas.

Phone:
(701)814-6992
Physical address:
6296 Donnelly Plaza
Ratkeville, Bahamas.
A cramped entryway doesn’t have to mean chaos. Whether it’s a narrow hallway or a corner by the front door, that first five feet of home takes serious abuse, shoes pile up, coats land wherever, and keys vanish into the void. The good news? Even the smallest entryway can work hard with the right layout and storage strategy. This isn’t about Pinterest-perfect styling. It’s about building a system that keeps daily traffic moving, prevents clutter from creeping into the rest of the house, and makes use of every vertical inch without major construction. Most of these solutions need only basic tools and an afternoon.
Entryways are high-traffic transition zones. They handle incoming groceries, outgoing kids, wet boots, mail, and whatever else crosses the threshold. When that space isn’t organized, the mess doesn’t stay contained, it migrates to countertops, stairs, and living areas.
A functional entryway also protects flooring. Shoes track in dirt, salt, and moisture. A designated drop zone with a boot tray or mat keeps grit from grinding into hardwood or carpet. That’s not cosmetic: it’s about reducing wear and cutting down on deep-cleaning frequency.
From a safety standpoint, clutter in a narrow entry creates trip hazards, especially in low light. Coats draped over banisters, bags left on the floor, and shoes scattered across the path are all avoidable risks. Installing dedicated storage eliminates those hazards and keeps egress routes clear, something worth considering if local building codes address hallway clearances (typically 36 inches minimum for primary exits under IRC).
Finally, an organized entryway sets the tone. It’s the first space anyone sees, including the homeowner. Walking into order instead of chaos has a measurable effect on stress levels, even if the rest of the house is mid-project.
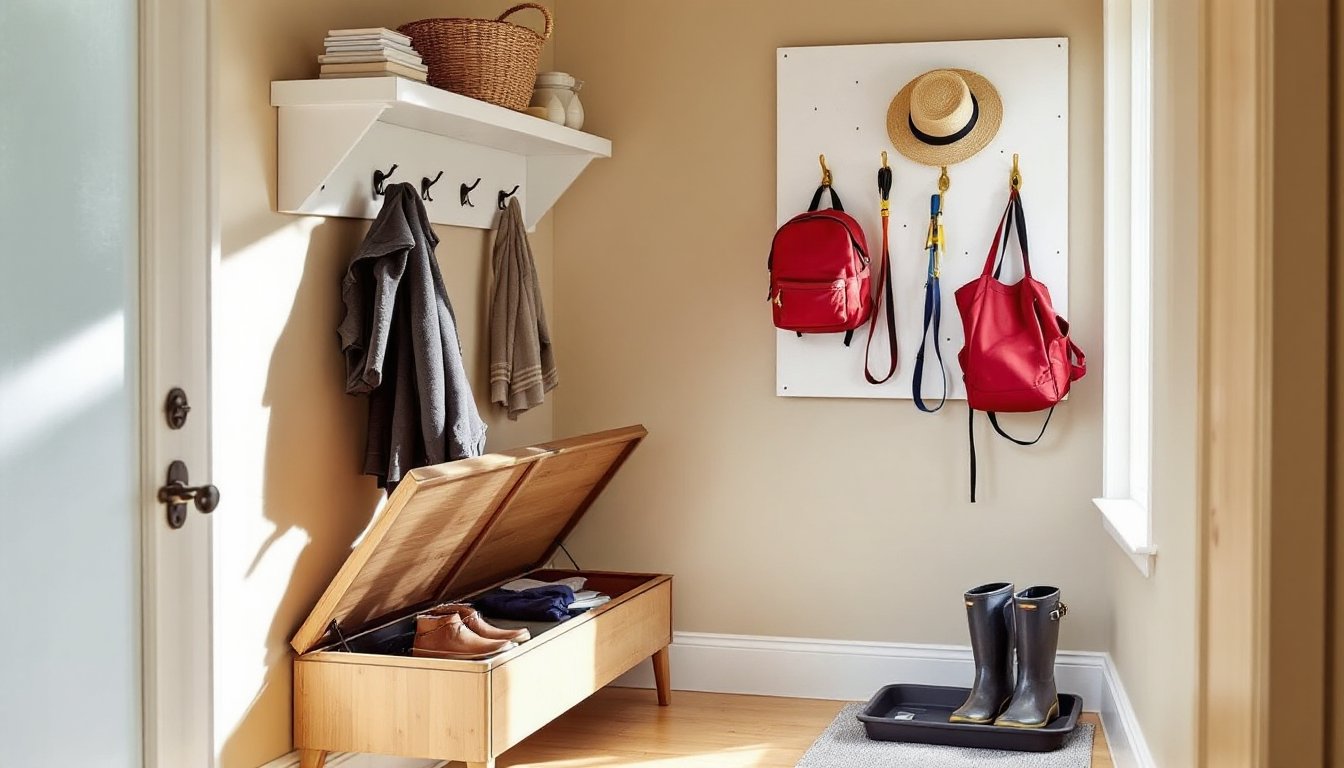
In a small entryway, floor space is precious. The walls, but, are wide open. Vertical storage keeps the footprint clear while adding serious capacity.
Wall hooks are the simplest upgrade. Mount them into studs (typically spaced 16 inches on center) or use toggle anchors rated for at least 50 pounds if hitting drywall only. Position hooks at varying heights: adult coats at 60–65 inches, kids’ gear lower at 40–48 inches, and a low row for bags or dog leashes around 30 inches. This keeps everyone’s items accessible without crowding.
Pegboard offers adjustable storage. A 24×48-inch panel mounted to a 1×2 furring strip creates standoff space for hooks and baskets. Use pegboard hooks designed for 1/4-inch holes, and rearrange them seasonally, more coat hooks in winter, more basket storage in summer. Pegboard works well in rentals, too, since patching a few screw holes is easier than filling a dozen.
Floating shelves add a landing spot for keys, mail, and small bins. Install them at eye level (around 60 inches) for visibility. Use keyhole brackets or hidden supports rated for the load, figure at least 20 pounds per linear foot if stacking items. Pair shelves with small baskets or trays to corral loose items. Pros featured on Apartment Therapy often recommend clear bins or labeled containers to keep small entryways from looking chaotic.
Safety note: Always wear safety glasses when drilling into walls, especially overhead. Drywall dust and tile chips can cause eye injuries.
Furniture in a tight entryway needs to earn its footprint. Single-purpose pieces take up space without delivering enough utility.
A storage bench is the workhorse of small entryways. Look for models with lift-top seats or cubbies underneath. Depth matters, most entryway benches run 14–18 inches deep, which is enough for shoe storage without blocking the walkway. If building a DIY version, use 3/4-inch plywood for the box and a 1×12 pine lid. Add a piano hinge along the back edge for easy access, and install soft-close lid supports (rated for 20–30 pounds) to prevent slammed fingers. Upholster the top with 2-inch foam and durable fabric like canvas or vinyl for easy cleaning.
Benches also provide a perch for putting on shoes, which reduces the temptation to sit on stairs or lean against walls (and scuff paint). If space allows, position the bench perpendicular to the door to create a natural boundary between the entry and main living area.
Slim console tables, typically 10–12 inches deep, fit against walls in narrow hallways. They won’t hold large items, but they’re ideal for a catch-all tray, a small lamp, or a wall-mounted mail sorter above. Many organizing experts recommend pairing consoles with baskets underneath to maximize every inch of storage.
If building a console from scratch, use 1×10 boards for the top and 2×2 legs set back a few inches from the edges. Secure the top with pocket screws and add a lower shelf at 6–8 inches off the floor for shoes or bins. Finish with semi-gloss paint or polyurethane for durability, entryway furniture takes a beating.
Tool note: A miter saw makes cleaner cuts for angled legs and trim, but a circular saw with a speed square works fine if cuts are sanded smooth afterward.
Visible storage helps, but hidden storage keeps a small entryway from looking busy. The goal is to tuck away as much as possible without sacrificing accessibility.
Under-bench drawers are a straightforward add-on. If a storage bench has open cubbies, install drawer slides (side-mount or undermount, rated for 75–100 pounds) and build simple drawer boxes from 1/2-inch plywood. Use finger pulls or recessed handles to avoid snags.
Over-door organizers use dead space. Look for models with pockets or hooks that hang from the top of the door. They’re ideal for scarves, gloves, sunglasses, or pet supplies. Make sure the door clears the organizer when opening, add a door stop if needed to prevent crushing items.
Recessed shelving (also called niche shelving) can be carved into walls if there’s space between studs. Standard stud bays are about 14.5 inches wide (between 2×4 studs) or 22.5 inches (between 2×6 studs in exterior walls). Cut drywall carefully with a utility knife and drywall saw, frame the opening with 2×4 blocking top and bottom, and line the interior with 1×4 trim or drywall returns. Add glass or wood shelves for shoes, hats, or seasonal items. This is cosmetic work, not structural, so no permit is typically required, but always check local codes before cutting into walls, especially on exterior or load-bearing walls.
Baskets with lids provide flexible hidden storage on shelves or under benches. Use woven baskets for breathability (good for shoes) or plastic bins for moisture protection (good for winter gear). Label the fronts with a label maker or chalkboard tags so everyone knows where things belong. Many decorating guides, including those on Martha Stewart, emphasize labeling as a key step in maintaining any organized system.
Professional organizers charge $50–150 per hour, and custom built-ins can run $500–2,000 depending on complexity. DIY alternatives deliver similar function at a fraction of the cost.
DIY coat rack from a board and hooks: Grab a 1×6 or 1×8 pine board (6–8 feet long), sand it smooth, and apply stain or paint. Space heavy-duty hooks every 6–8 inches, screwing into the board’s face. Mount the board to wall studs with 3-inch wood screws or heavy-duty anchors. Total cost: $20–40.
Shoe cubby from crates: Stack and secure wood crates (available at craft stores or home centers) using wood glue and 1.25-inch screws. Arrange them in a grid, open side out. Finish with paint or leave raw for a rustic look. Each crate holds 2–4 pairs of shoes. Cost: $30–60 for a 6-crate unit.
Pegboard mail and key station: Cut a 24×24-inch pegboard panel, paint it to match the wall, and mount it with 1×2 furring strips behind for clearance. Add pegboard hooks, a small shelf, and magnetic or adhesive key holders. Mount a clipboard or wire basket for mail. Cost: $15–25.
Floating shelf with hidden hooks: Build a hollow floating shelf from 1×6 boards (top and bottom) and 1×4 boards (sides). Glue and screw the box together, leaving the back open. Mount a 2×2 cleat to the wall studs, then slide the shelf over it. Drill holes through the bottom face and install coat hooks that hang down, hidden from above, but functional from below. Cost: $25–45.
Safety reminder: Use hearing protection when cutting with power saws, and wear a dust mask when sanding. MDF and composite boards create fine dust that’s irritating to lungs.
Material note: Choose materials based on durability needs. Pine is affordable and easy to work with but dents easily. Poplar is harder and takes paint well. Plywood (especially Baltic birch) offers strength for shelving and won’t sag under load like solid wood can over time.