Phone:
(701)814-6992
Physical address:
6296 Donnelly Plaza
Ratkeville, Bahamas.

Phone:
(701)814-6992
Physical address:
6296 Donnelly Plaza
Ratkeville, Bahamas.
Cloud-connected security cameras have shifted from luxury tech to practical home protection tools that most DIYers can install themselves. These cameras stream footage to remote servers, ditching the old headaches of local storage devices that fail, fill up, or get stolen along with the evidence. But choosing a system means understanding subscription costs, bandwidth limits, and whether your internet connection can handle continuous uploads. This guide walks through what matters when selecting a cloud storage security camera, from encryption standards to mounting hardware, so homeowners can make informed decisions without wading through marketing jargon.
A cloud storage security camera captures video footage and transmits it over your home’s Wi-Fi network to remote servers managed by the camera manufacturer or a third-party service. Unlike traditional systems that record to a DVR or SD card onsite, cloud cameras upload clips or continuous streams to offsite data centers, where they’re stored for a set retention period.
The camera itself contains a video sensor, processor, and network interface. When motion is detected (or on a continuous schedule), the device compresses the video using codecs like H.264 or H.265, then encrypts and sends it upstream. Most modern cameras use TLS encryption during transmission and store files encrypted at rest on the server.
Homeowners access footage through mobile apps or web portals, which pull the video back down from the cloud. This setup means you can review clips from anywhere with an internet connection, even if someone disables the camera or steals it after an event. The tradeoff: you’re dependent on internet uptime, upload bandwidth (typically 1–2 Mbps per camera for HD), and the manufacturer’s ongoing service.
Some hybrid models include local SD card slots as backup, writing footage both to the card and to the cloud. If your network drops, the camera keeps recording locally, then syncs to the cloud once connectivity returns.
Remote access ranks as the top practical advantage. Whether you’re at work or on vacation, you can pull up live feeds or review past events without being on the same network as your camera. This works as long as the camera stays powered and connected.
Tamper resistance comes next. A burglar can rip a camera off the wall or cut power, but if footage already uploaded to the cloud, it’s preserved. Local DVR systems lose everything if the recorder is stolen or destroyed.
No capacity management eliminates the chore of swapping hard drives or clearing SD cards. The service provider handles storage scaling, backups, and hardware maintenance. You pay a subscription, and they keep the infrastructure running.
Shareable access lets multiple household members view the same camera feeds without complicated network configurations. Grant access through the app, and family members get their own login credentials.
AI-powered alerts have become standard on many cloud-connected devices by 2026. Servers analyze uploaded footage to distinguish between people, vehicles, animals, and package deliveries, reducing false alerts from swaying branches or passing shadows. This processing happens off-camera, leveraging more powerful cloud hardware than an onboard chip could manage.
Most manufacturers offer a basic free tier that stores limited footage, typically the last 24 hours of motion-triggered clips, often at reduced resolution or with a cap on clip length (e.g., 10 seconds per event). This works for casual monitoring but falls short if you need to review an entire afternoon or access footage from three days ago.
Paid subscriptions expand retention periods, resolution, and features. Common tiers include:
Some brands bundle multi-camera plans at a discount. Others charge per-camera regardless of how many you own. Comparing major storage plans can reveal significant cost differences for similar feature sets.
Annual prepayment often nets a discount equivalent to one or two free months. Read cancellation terms, some services don’t prorate refunds if you cancel mid-year.
Bandwidth and data caps matter if your ISP enforces monthly limits. A single 1080p camera running continuous recording can upload 50–150 GB per month. Multiple cameras can push you over a 1 TB cap, triggering overage fees.
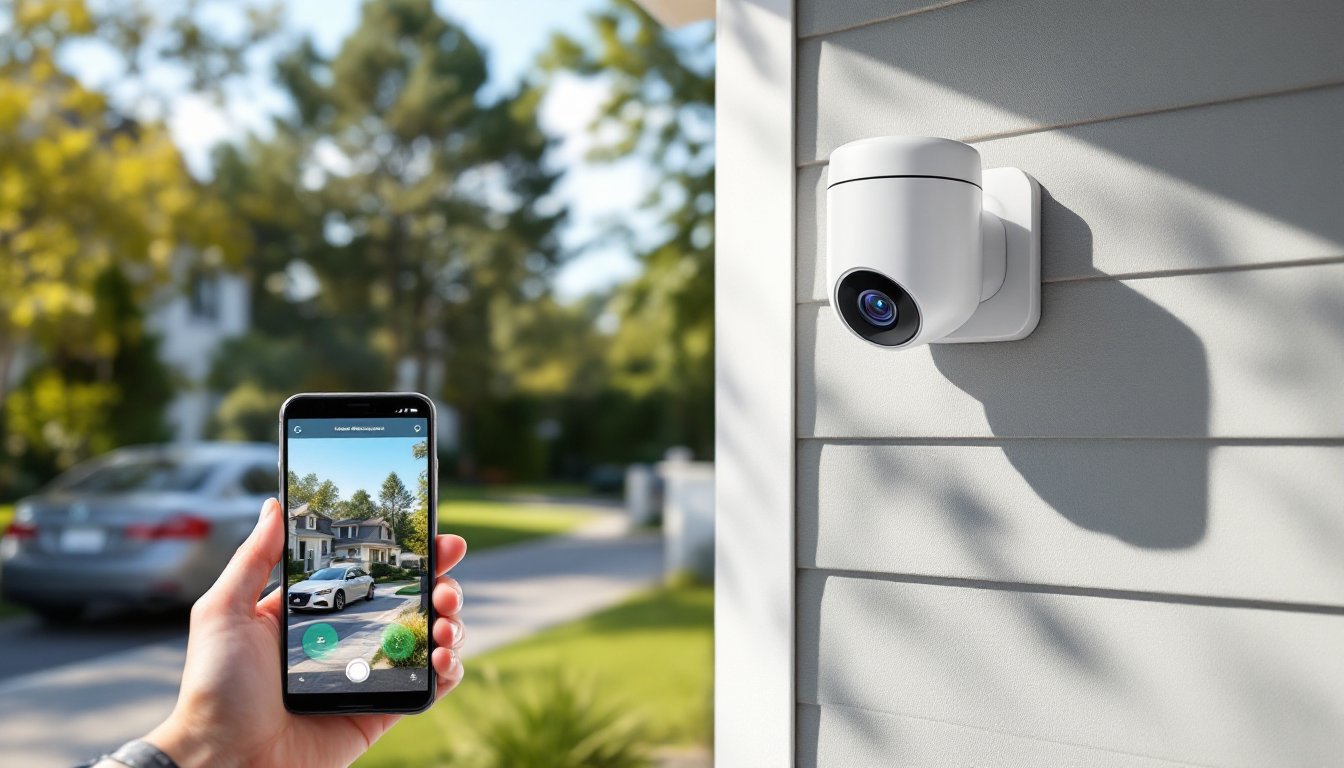
Resolution and field of view directly impact usability. A 2K (1440p) sensor offers a clear middle ground between 1080p and 4K, providing enough detail to identify faces or license plates without overwhelming upload bandwidth. Look for a 120–160° horizontal field to cover doorways or driveways with a single unit.
Two-way audio with noise cancellation lets homeowners speak to delivery drivers or deter intruders. Cheap microphones produce tinny, echo-prone sound: better models include speaker amplification above 85 dB.
Night vision comes in two flavors: infrared LEDs (black-and-white footage) and color night vision (using ambient light or a built-in spotlight). IR is power-efficient and works in total darkness up to 25–30 feet. Color night vision helps identify clothing or vehicle colors but requires some light source.
Weather rating matters for outdoor installs. An IP65 or IP66 rating handles rain and dust: IP67 tolerates brief submersion. Cameras rated below IP65 need sheltered mounting under eaves.
Power options include wired (12V DC or PoE Ethernet), battery, or solar panel. Battery cameras offer flexible placement but need recharging every 2–6 months depending on activity levels. PoE simplifies installation if you’re running network cable anyway, power and data over one Cat5e or Cat6 line.
Smart home integration with Alexa, Google Assistant, or Apple HomeKit allows voice control and automation (e.g., “turn off cameras when I’m home”). Verify compatibility before buying: not all cameras support all platforms even when they advertise “works with Alexa.”
Encryption standards are non-negotiable. Demand AES-128 or AES-256 encryption for data in transit and at rest. Cameras lacking end-to-end encryption expose footage to potential interception or unauthorized access by the service provider.
Two-factor authentication (2FA) should be mandatory on your account. Even strong passwords get compromised in data breaches: 2FA adds a second verification layer via SMS, email, or authenticator app.
Firmware updates patch security vulnerabilities. Check whether the manufacturer delivers automatic updates or requires manual installation. Brands that abandon support after two years leave cameras exposed to known exploits.
Data jurisdiction affects legal protections. US-based servers fall under domestic law enforcement requests: servers in the EU follow GDPR. Some manufacturers don’t disclose server locations. If privacy matters, research where your footage actually lives.
Third-party access policies vary widely. Review smart home security practices and the manufacturer’s terms to understand who can view your footage. Some companies reserve rights to review clips for “service improvement” or comply with warrants without notifying you first.
Sharing controls let you grant temporary access to house sitters or contractors without handing over your master password. Revoke access immediately when no longer needed.
Audio recording laws differ by state. Roughly a dozen states require two-party consent to record conversations. Cameras that capture audio from public sidewalks or neighbors’ yards can create liability. Post visible signage if your cameras record sound.
Site survey first. Walk your property and identify priority zones: front door, driveway, side gates, basement windows. Download the camera’s app and use its field-of-view preview tool (many brands offer this) to visualize coverage before drilling holes.
Wi-Fi signal strength is critical. Stand at each proposed camera location with your phone and test signal bars. Cameras need consistent -60 dBm or stronger for reliable streaming. Weak signal causes dropped connections and missed clips. A Wi-Fi extender or mesh node may be necessary for distant corners.
Mounting height between 8–10 feet deters tampering while keeping facial features recognizable. Lower mounts risk being blocked by shrubs or vandalized: higher mounts lose detail.
Weatherproof connections if you’re running low-voltage wire outdoors. Use silicone-filled wire nuts or waterproof junction boxes. Regular wire nuts corrode in humid climates.
Power routing for wired cameras often taps into exterior outlet circuits. Confirm the circuit breaker is rated for the added load. Most cameras draw under 10W, but four cameras on one circuit still add up. If drilling through siding or masonry, angle the hole slightly downward to prevent water intrusion, then seal with exterior-grade silicone caulk.
Avoid backlighting. Don’t aim cameras directly at sunrise/sunset directions or bright streetlights. Backlighting washes out faces and makes motion detection unreliable. Adjust mounting angle or add a sun hood.
Test before finalizing. Mount the camera temporarily with painter’s tape or a single screw, then review 24 hours of footage. Check for blind spots, glare, and false alerts from tree branches or car headlights. Adjust and repeat until coverage is right, then complete the permanent install.
PPE for exterior installs: Wear safety glasses when drilling overhead, and use a sturdy ladder with a stabilizer bar on uneven ground. If running cable through an attic, bring a dust mask, most attics accumulate fiberglass particles.
Cloud storage security cameras offer practical advantages for homeowners willing to manage subscriptions and bandwidth. Prioritize encryption, compare retention plans honestly, and test signal strength before committing to a mounting location. With solid prep work and realistic expectations about what cloud storage delivers, these systems provide reliable remote monitoring that outpaces older local-only setups.