Phone:
(701)814-6992
Physical address:
6296 Donnelly Plaza
Ratkeville, Bahamas.

Phone:
(701)814-6992
Physical address:
6296 Donnelly Plaza
Ratkeville, Bahamas.
Bathrooms are often the smallest rooms in a home, yet they’re expected to hold everything from towels to cleaning supplies. An over the commode cabinet solves this common problem by using vertical space that would otherwise sit empty above the toilet. Whether you’re dealing with a cramped apartment bathroom or just want to maximize storage efficiency, an over the toilet vanity or bathroom storage cabinet transforms wasted space into functional real estate. This guide walks you through what these cabinets are, why you need one, and how to pick and install the right model for your space.
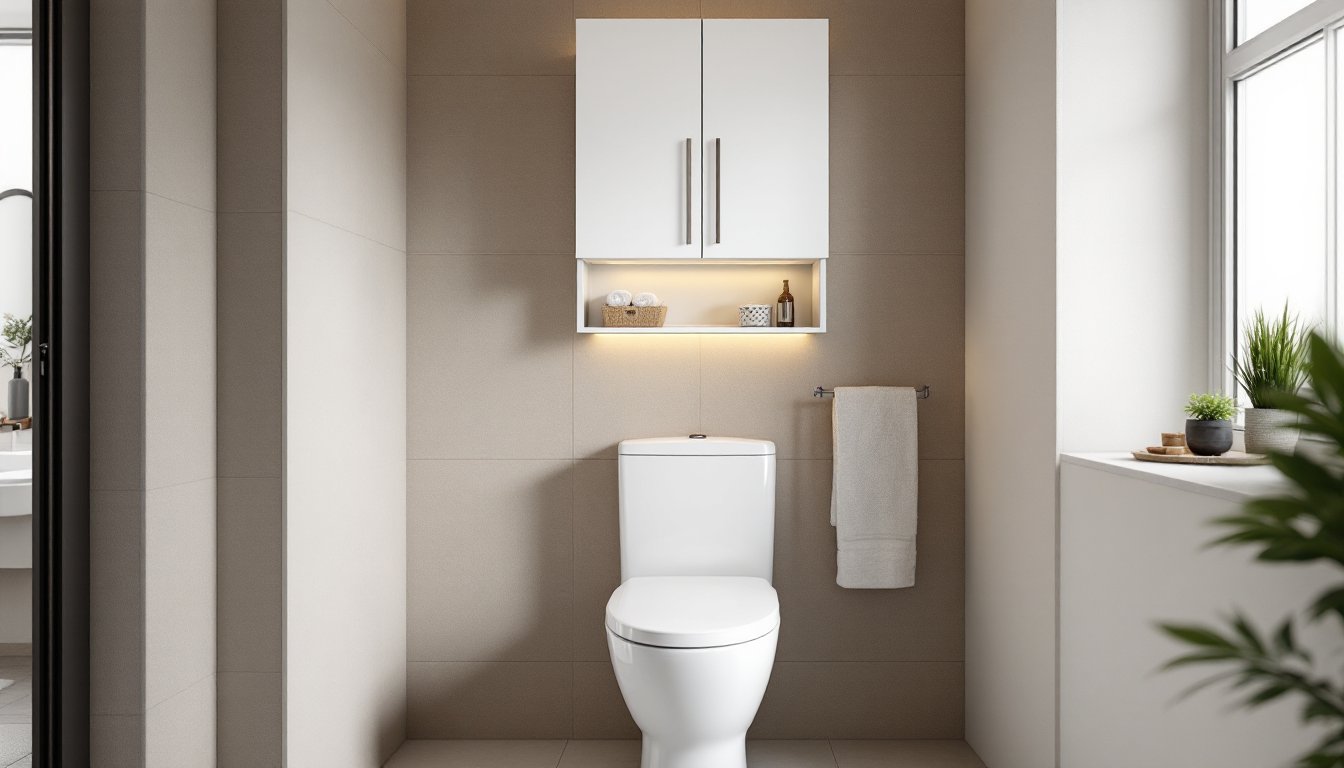
An over the commode cabinet is a freestanding or wall-mounted storage unit designed to fit directly above your toilet. Unlike a traditional medicine cabinet mounted on the wall beside the sink, an over the toilet vanity straddles the toilet tank, with its base frame spanning the width of the bowl and seat. Most models stand 24 to 30 inches tall and come with adjustable shelves to accommodate various item sizes.
These cabinets come in two main formats: open-frame units with exposed shelving and fully enclosed designs with doors. The concept dates back decades, but modern bathroom storage cabinets have evolved significantly in style and material options. You’ll find models in wood, metal, engineered wood, and composite materials, many featuring clean-line aesthetics that work in contemporary, farmhouse, and transitional bathrooms alike.
The primary advantage is accessibility, items are right where you need them without requiring additional wall space or remodeling. Installation usually takes 20 to 40 minutes for a freestanding unit (no tools required) or 1 to 2 hours if you’re anchoring a cabinet to wall studs for stability. Rental-friendly options exist too, making this a smart choice for temporary living situations.
Small bathrooms are a universal headache. Most homes lack adequate counter or vanity space for daily essentials, towels, toiletries, cleaning products, and backup supplies. Clutter doesn’t just look bad: it makes the room feel cramped and complicated to navigate, especially in the morning rush.
Standard storage solutions like over-the-door organizers and pedestal cabinets under the sink often aren’t enough. Wall-mounted shelves eat into visual space and can feel cluttered if not carefully styled. An over the toilet vanity fills a genuine void: it’s a dedicated, purpose-built storage zone that doesn’t compete with other bathroom elements.
From a practical perspective, vertical storage is the most efficient use of limited floor area. When you’re looking at a 5-by-8-foot bathroom, every square foot matters. Resources like Bob Vila emphasize that smart storage planning is foundational to any functional bathroom redesign. Beyond function, the right bathroom storage cabinet becomes a design element that pulls the space together, creating the illusion of a more organized and intentional room.
Open-frame over the commode cabinets feature visible shelves with no doors or minimal backing. These units are lightweight, easy to install, and perfect for small bathrooms because they don’t visually bulk up the space. They’re ideal if you’re storing attractive items, rolled towels, baskets, decorative bottles, and want a display-friendly look.
The downside? Dust accumulates faster on open shelves, and you can’t hide clutter. Open designs also work best in moisture-controlled bathrooms: if humidity runs high, dust and mildew are more noticeable. Material options for open shelving range from metal (steel or aluminum) to solid wood and engineered wood. Metal frames with wood shelves offer a modern farmhouse aesthetic, while all-wood units feel warmer and more traditional.
Most open models offer 3 to 5 shelves with adjustable height, letting you customize spacing for tall bottles or stacked linens. Budget-friendly open cabinets run $50 to $150, while mid-range options with solid wood shelves and metal frames go from $150 to $300.
Fullly enclosed cabinets hide everything behind doors, offering a cleaner, more buttoned-up appearance. They’re available in styles ranging from simple flat-panel doors to louvered or glass-front designs. Closed cabinets protect contents from dust and humidity, making them better for damp bathrooms or homes with high moisture.
The 9 Over-The-Toilet Cabinet Ideas For The Teeniest Bathrooms showcases how diverse closed designs can be, from minimalist white lacquer to rich wood finishes. Glass-front cabinets offer a middle ground: items are protected but still visible, letting you display attractive storage solutions like woven baskets or matching towel sets.
Closed cabinets typically cost $200 to $600 depending on materials and finish quality. Premium options with soft-close hinges and interior organizers can exceed $700. Closed designs work especially well in contemporary and traditional bathrooms where you want a unified look without visual noise. Consider your bathroom’s humidity level and how much item rotation you expect: if you’re constantly swapping supplies, open shelving saves time.
Measure before you buy, this is non-negotiable. You need three critical dimensions: the width of your toilet (most standard toilets are 27 to 30 inches wide), the height from the toilet tank lid to your ceiling (or to any obstruction like a window or exhaust vent), and the depth of the space (how far the cabinet can stick out from the wall without blocking access).
Most over the toilet cabinets are 24 to 27 inches wide, fitting neatly over standard toilets with 2 to 3 inches of clearance on each side. Height ranges from 20 to 30 inches, but verify your ceiling clearance. A cabinet that’s too tall will feel crowded and block visual space: too short wastes potential storage. Leave at least 6 inches of clearance between the cabinet’s top and ceiling trim for proportion.
Depth matters for function. Shallow units (6 to 8 inches) are space-efficient but only fit slim bottles and folded items. Deeper models (10 to 12 inches) accommodate bulkier supplies like toilet paper rolls or hair tools. If you have a tiny bathroom, choose shallow: if space allows, go deeper for flexibility.
Weight distribution is also worth considering. Freestanding units don’t require installation but must be stable on an uneven floor. Wall-anchored cabinets distribute weight across wall studs, making them safer and more secure. If your bathroom has radiant heating or plumbing runs behind the wall where the cabinet would sit, check your floor plan before drilling. Family Handyman offers solid guidance on identifying studs and avoiding obstacles during wall installation. Most modern bathrooms have studs every 16 inches on center: use a stud finder to confirm.
Freestanding Installation is the easiest route. Set the cabinet in place, adjust legs or feet until it’s level (use a 2-foot bubble level), and test stability by gently pushing side to side. Some models include shims or adjustable feet to compensate for uneven floors. Secure the cabinet to wall studs with lag bolts or screws if recommended by the manufacturer, this prevents tipping.
Wall-Mounted Installation requires more prep but offers permanence. Use a stud finder to locate wall framing, marking studs with a pencil. Most cabinets include a mounting rail that attaches to studs using 2.5-inch wood screws or lag bolts (check your cabinet’s specs). Drill pilot holes first, this prevents wood splitting and makes driving fasteners easier. Mount the rail level: use a 4-foot level if available, checking both horizontally and vertically. Once the rail is secure, hang the cabinet according to manufacturer instructions and test weight distribution before filling shelves.
Key Safety Considerations:
Finishing Touches:
Caulk any gaps between the cabinet and wall with paintable silicone caulk: this keeps moisture out and looks polished. If your cabinet came unfinished or you’re upgrading an older unit, a coat of bathroom-grade primer and semi-gloss or satin paint prevents moisture damage and extends cabinet life. Sand first with 120-grit sandpaper, wipe clean, apply primer, and finish with 2 coats of paint. Allow 24 hours between coats and full cure before exposing to moisture.
Arrange items strategically: place heavier supplies on lower shelves, lightweight linens on top shelves, and frequently used items at eye level. Use shelf liners or woven baskets to corral small items and reduce visual clutter.
<h2 id="” data-id=””>Wrapping Up
An over the commode cabinet is one of the simplest, most impactful storage upgrades a homeowner can make. It solves a real problem, insufficient bathroom storage, without requiring renovation or significant skill. Whether you choose open shelving for a light, airy feel or a closed cabinet for a refined, organized look, the right unit transforms your bathroom from cramped to functional.
Take time to measure accurately, choose a style that matches your decor, and follow installation guidelines closely. Done well, your cabinet will serve reliably for years, quietly doing its job of keeping your bathroom tidy and efficient.