Phone:
(701)814-6992
Physical address:
6296 Donnelly Plaza
Ratkeville, Bahamas.

Phone:
(701)814-6992
Physical address:
6296 Donnelly Plaza
Ratkeville, Bahamas.
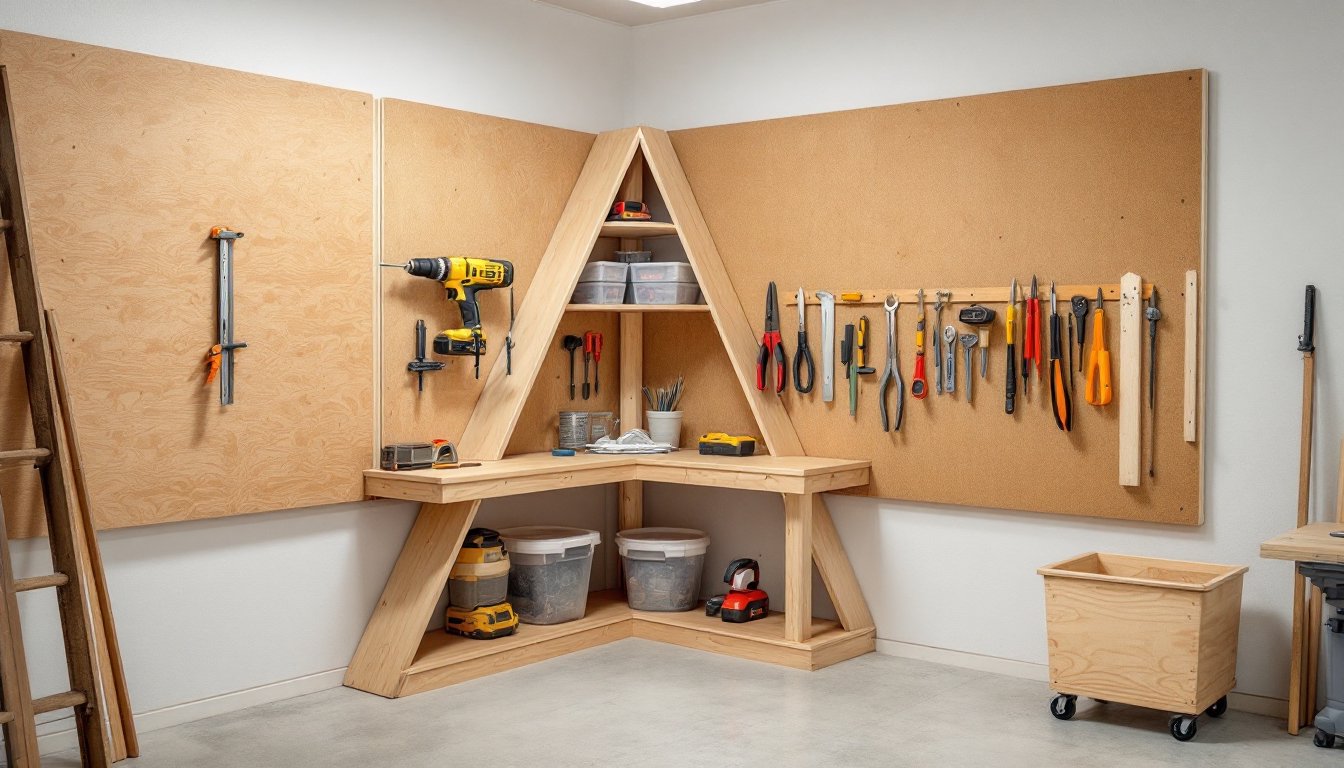
Workshop corners typically become dead zones, places where random offcuts, old paint cans, and orphaned clamps pile up until someone trips over them. That’s wasted real estate. Every corner represents about three to four cubic feet of vertical storage potential that most DIYers ignore while complaining about not having enough space. The solution isn’t a bigger garage or a backyard shed expansion. It’s rethinking how those 90-degree angles can hold the tools and materials currently cluttering your benchtop. Smart corner storage turns frustrating gaps into organized, accessible systems that keep frequently used tools within arm’s reach.
Most shop layouts prioritize wall space, pegboards, French cleats, and overhead racks hug the perimeter while corners sit empty or worse, become catch-all zones. But corners offer distinct advantages over flat wall storage.
First, corner storage is accessible from two directions. A well-designed corner unit lets someone grab a drill from one side while another person reaches for clamps from the adjacent wall. That dual access matters in small shops where multiple projects run simultaneously.
Second, corners naturally shield tools from high-traffic areas. Tools stored in corners face less risk of accidental bumps or knocks compared to items hanging mid-wall near a workbench. This makes corners ideal for storing precision measuring tools, specialty hand planes, or sharp chisels that need protection.
Third, vertical corner systems use the full ceiling height without creating the visual clutter of floor-to-ceiling shelving across an entire wall. A corner tower holds as much as a four-foot wall section but occupies less perceived space, keeping the workshop feeling open.
The challenge with corners is depth. Standard shelving creates awkward reach zones where items in the back become functionally invisible. That’s why purpose-built corner storage, with angled shelves, rotating platforms, or pull-out mechanisms, outperforms improvised solutions.
Triangular corner shelves maximize usable surface area while minimizing wasted depth. Pre-fabricated metal corner shelving units typically come in 18-inch or 24-inch depths and support 200-300 pounds per shelf when anchored into studs. Look for adjustable shelving so the layout adapts as tool collections change.
For heavier equipment like benchtop planers or tile saws, build a corner shelf using 2×10 or 2×12 dimensional lumber (actual dimensions: 1.5″ × 9.25″ or 1.5″ × 11.25″). Cut the boards at 45-degree angles to fit snugly into the corner, then mount them to wall studs with 3-inch construction screws and L-brackets rated for the expected load.
Pegboard corner wraps provide flexible tool storage without shelving’s footprint. Install ¼-inch pegboard on both walls forming the corner, wrapping around the angle to create a continuous surface. Use a 1×2 furring strip (actual: 0.75″ × 1.5″) behind the pegboard as a spacer, this gap allows pegboard hooks to fit properly. Mount the furring strips into studs every 16 inches for stability.
Pro tip: Spray-paint pegboard hooks in color codes (red for power tools, blue for hand tools, yellow for measuring) to speed up tool returns and maintain organization.
Rotating storage brings back-corner items to the front without reaching or rearranging. Lazy Susan bearings (available in 6-inch to 24-inch diameters) support DIY rotating shelves for drill bits, fasteners, finishing supplies, and hand tools.
For heavier items like power tool batteries or pneumatic nailers, industrial-grade carousel systems handle 50-75 pounds per shelf. These units mount to both walls and typically feature three to five rotating tiers. Installation requires level mounting, use a 4-foot level and shim as needed, because even slight angles cause rotating shelves to drift or bind.
Commercial rotating tool racks designed for mechanics’ workshops adapt well to woodworking shops. These freestanding units fit into corners and hold everything from wrenches to chisels in easy-to-spin compartments.
Safety note: Secure rotating units to wall studs with brackets, especially in earthquake-prone regions or homes with active children. A top-heavy rotating shelf can tip if pulled forward.
Building custom corner storage lets DIYers tailor dimensions and features to specific tools. These projects require basic carpentry skills and common workshop tools.
Corner Clamp Rack: Cut a 2×4 (actual: 1.5″ × 3.5″) into a vertical post matching the desired height (6-8 feet works for most shops). Drill 1-inch holes spaced 4 inches apart down the length of the 2×4. Mount the post vertically in the corner using L-brackets anchored into studs. Bar clamps slide into the holes, storing vertically with handles accessible. For free plans on similar woodworking storage projects, beginners can find detailed cut lists and assembly instructions.
Corner Scrap Bin: Build a triangular plywood box to fit the corner angle. Cut two pieces of ¾-inch plywood in right triangles with 18-inch legs. Cut side panels to match the height (24-30 inches tall works well). Assemble with 1¼-inch pocket screws or wood glue and finish nails. Leave the top open for quick scrap disposal. Mount on 3-inch casters for mobility, or secure to the floor with corner brackets.
Sliding Corner Shelf: Install full-extension drawer slides rated for 100 pounds on two adjacent corner walls at the same height. Build a triangular shelf platform from ¾-inch plywood. Attach one set of slides to each wall, with the mating slides fixed to the shelf’s side edges. The shelf pulls out from the corner on both slides simultaneously, providing full access to stored items. This works exceptionally well for router bit collections, sanding supplies, or finishing products. More advanced workshop storage systems include detailed hardware lists for similar slide-out designs.
Overhead Corner Lumber Rack: For long stock storage, lag-bolt 2×4 brackets into ceiling joists in opposite corners. Space brackets 24 inches apart vertically. Cut 2×4s at 45-degree angles to fit between brackets, creating angled shelves that hold dimensional lumber, PVC pipe, or molding. The 45-degree angle prevents lumber from rolling off while keeping the corner area below accessible.
PPE reminder: Wear safety glasses when drilling overhead and use hearing protection when cutting materials with power saws. A dust mask or respirator is essential when cutting treated lumber or creating fine sawdust.
Matching storage type to tool type prevents frustration and keeps workshops functional. Consider these factors before building or buying corner storage.
Tool weight and dimensions: Power tools like miter saws, routers, and sanders need shelving that supports 30-50 pounds per item. Lightweight hand tools, screwddrivers, pliers, tape measures, work well on pegboard hooks or shallow shelves. Measure tool footprints before building fixed shelves to avoid platforms too small to be useful.
Access frequency: Tools used daily (tape measure, speed square, utility knife) belong on pegboard or shallow shelves at chest height. Seasonal equipment (holiday light hangers, gutter cleaning tools) can occupy higher corner shelves accessed with a stepladder.
Workshop layout: In shops with workbenches in corners, overhead corner storage makes sense. In open-corner layouts, floor-to-ceiling corner towers provide maximum capacity. Map traffic patterns before installing fixed storage, corner cabinets shouldn’t block pathways to panel saws or workbenches.
Climate control: Unheated garages and outdoor sheds experience temperature and humidity swings. Metal corner racks resist moisture better than particleboard units. For precision tools like combination squares or dial calipers, enclosed corner cabinets with weather stripping provide better protection than open shelving.
Budget and skill level: Pre-fab metal corner shelving units cost $80-$200 depending on load capacity and height. DIY plywood corner shelves run $30-$60 in materials but require cutting, drilling, and finishing. Rotating carousel systems range from $150-$400 for commercial units. Beginners should start with simpler DIY storage projects before tackling complex rotating systems.
Pro tip: Avoid particleboard or MDF for workshop storage in humid climates. These materials swell and fail when exposed to moisture from concrete floors or seasonal humidity. Plywood, solid wood, or metal provide better long-term durability.
Building corner storage solves only half the problem. Without a logical organization system, corner storage becomes another junk magnet.
Zone by task: Group tools by project type rather than tool type. Dedicate one corner to finish work (sanders, brushes, stains, rags), another to layout and measuring (squares, levels, marking gauges), and a third to fastening (drills, drivers, screws, nails). This task-based approach reduces trips around the shop during projects.
Label everything: Use a label maker or paint marker to identify shelf contents. Labels matter most for storage bins on high corner shelves where visibility is poor. Include both item names and quantities (e.g., “Sandpaper 80-220 grit”) so restocking happens before supplies run out.
Use depth strategically: Place frequently used items on the front third of corner shelves. Reserve the deep back corners for overflow supplies, spare blades, or seldom-used specialty tools. Alternatively, use pull-out trays or lazy Susan platforms to eliminate dead space.
Carry out shadow boards: Trace tool outlines on pegboard or plywood backing. Paint the outlines in contrasting colors so missing tools are immediately obvious. Shadow boards work particularly well in corners where multiple users share tools, everyone knows exactly where items belong.
Maintain vertical clearance: When stacking tools or materials on corner shelves, leave 3-4 inches of clearance between shelf levels. Cramped spacing makes it difficult to grab items without disturbing everything else on the shelf. Adjustable shelving allows fine-tuning as tool collections evolve.
Schedule quarterly reviews: Every three months, empty corner storage completely. Discard broken tools, return borrowed items, and relocate rarely used equipment to less accessible storage areas. This prevents corner storage from gradually filling with obsolete or redundant tools.
Safety consideration: Never store flammable liquids (paint thinner, mineral spirits, gasoline) on overhead corner shelves. These belong in approved flammable storage cabinets at ground level, away from ignition sources and heat. Check local fire codes, many jurisdictions limit quantities of flammable materials stored in residential garages.