Phone:
(701)814-6992
Physical address:
6296 Donnelly Plaza
Ratkeville, Bahamas.

Phone:
(701)814-6992
Physical address:
6296 Donnelly Plaza
Ratkeville, Bahamas.
A circular saw left on a workbench isn’t just clutter, it’s a safety hazard and a sign of wasted shop space. Whether dealing with a sidewinder or a worm drive, these tools need dedicated storage that protects the blade, keeps cords tangle-free, and gets them off the floor. Good storage isn’t about aesthetics: it’s about creating a safer, more efficient workspace where tools stay ready for the next cut. From wall-mounted systems to portable racks, the right setup depends on shop size, saw collection, and how often the tool moves between job sites.
Circular saws rank among the most common causes of workshop injuries, and improper storage plays a bigger role than most DIYers realize. A saw tossed on a shelf can tip forward when someone reaches for something else, exposing the blade. Cords draped over edges create trip hazards and strain the wire insulation over time, increasing shock risk.
Beyond safety, poor storage dulls blades faster. When saws stack against other metal tools or sit in damp areas, carbide teeth chip and rust starts on the blade plate. Replacing a quality 40-tooth combo blade runs $25–$50, a cost that adds up when blades degrade prematurely.
Workshop efficiency matters too. Fumbling through a pile of tools to find the circular saw wastes time on every project. Dedicated storage means the saw lives in one predictable spot, with the blade guard intact and the power cord loosely coiled, not knotted around the handle. Shops with multiple users (family members, housemates) benefit even more from clearly designated tool spots.
Proper storage also preserves resale value. A saw with a dinged baseplate, cracked housing, or bent blade guard signals neglect to potential buyers. Treating tools well from day one pays off whether keeping them for decades or upgrading in a few years.
Wall storage frees up bench and floor space, the two most contested real estate zones in any shop. It works best for stationary workshops where the saw stays on-site rather than traveling to job locations.
Pegboard remains a shop staple for good reason, it’s cheap, customizable, and widely available at any home center. For circular saw storage, use heavy-duty metal hooks rated for at least 10 pounds: plastic hooks flex and fail under tool weight. Hang the saw by the handle or, if the body shape allows, cradle it in a pair of J-hooks with the blade facing the wall. Always engage the blade guard before hanging.
One downside: pegboard holes loosen over time with repeated hook adjustments. Backing the pegboard with ¾-inch plywood adds rigidity and lets screws bite into something solid.
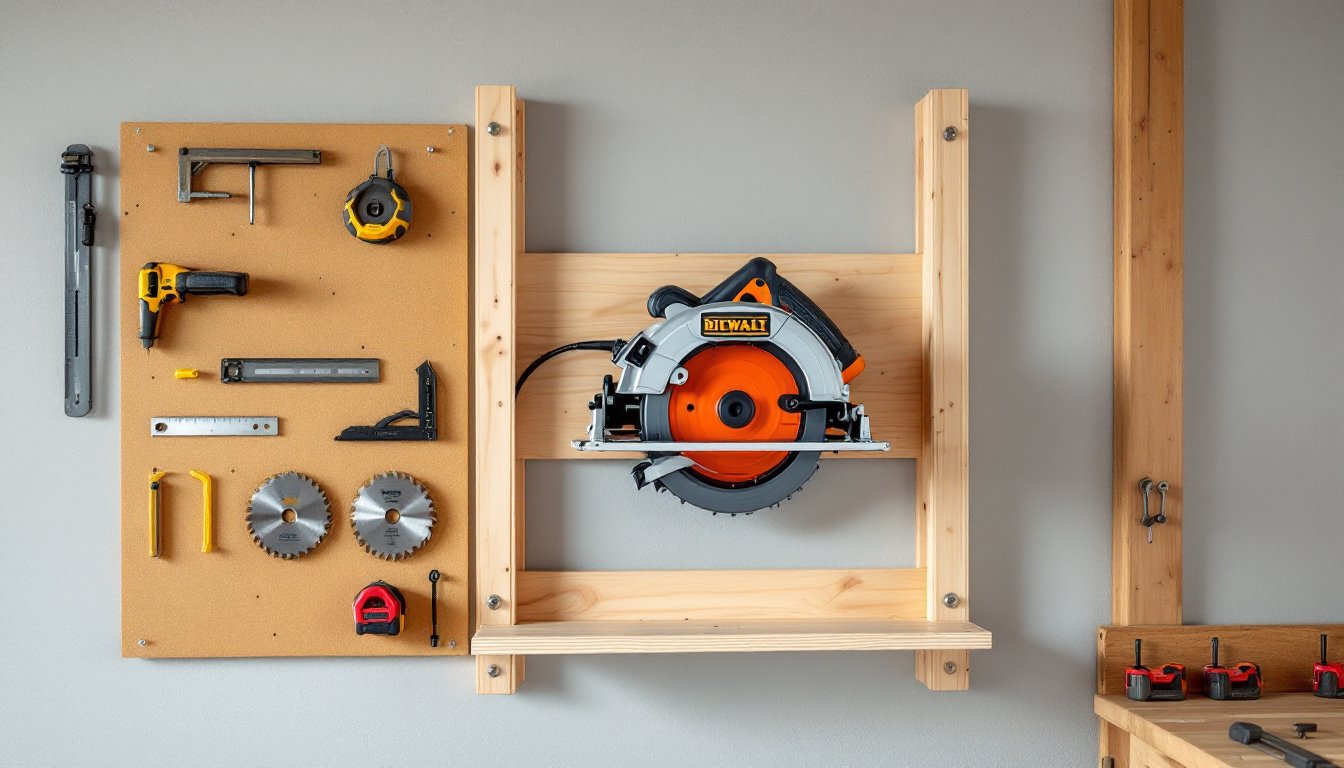
French cleat systems offer more flexibility and strength. A cleat is a board ripped at a 45-degree bevel, with one half screwed to wall studs and the mating half attached to a holder or shelf. The interlocking bevels lock securely but allow easy repositioning. For circular saws, build a simple plywood holder with a cleat on back, saw rests on a shallow shelf, handle accessible, blade guard facing inward. This setup handles heavier worm-drive saws (which can hit 13–15 pounds) without sagging. Projects like this are common on woodworking plan sites that specialize in shop organization builds.
For those who prefer a cleaner look than pegboard, custom brackets work well. Cut a 2×4 or 2×6 to about 12 inches long, screw it horizontally into studs, and notch the top edge to cradle the saw body. The blade guard rests against the wall, and the handle juts out for easy grab-and-go access.
Open shelving units also work, especially when combined with dedicated bins or trays for blades and wrenches. Use ¾-inch plywood or MDF for shelves, spacing them about 10 inches apart vertically. Adding a lip or dowel at the front edge prevents the saw from sliding off. Avoid storing circular saws on high shelves, lifting a 10-pound tool overhead increases drop risk and awkward handling.
Contractors and DIYers who work across multiple sites need storage that moves. Leaving a circular saw loose in a truck bed invites theft, damage from road vibration, and tangles with other gear.
Rolling tool carts are the simplest mobile solution. A basic steel cart with two or three shelves holds a circular saw on the top level, with cordless batteries, blades, and a speed square on lower tiers. Lock the cart in the garage between jobs, then wheel it to the driveway or yard when cutting materials. Look for carts with locking casters, at least two of the four wheels should lock to prevent rolling mid-cut.
Portable tool bags and totes designed for circular saws typically feature padded compartments, reinforced handles, and external pockets for accessories. These work well for occasional off-site jobs but lack the durability of hard cases for daily jobsite use. Brands often size bags to specific saw models, so check dimensions before buying.
Hard-shell cases provide the best protection for transport. Many higher-end circular saws come with molded plastic cases, but aftermarket options like Pelican-style cases (with foam inserts custom-cut to fit the tool) offer superior impact resistance. They’re overkill for a basement shop but make sense for professionals loading and unloading trucks multiple times a day. Expect to spend $40–$80 for a quality case that fits a standard 7¼-inch circular saw.
For truck-based workers, consider a locking toolbox or gang box mounted in the bed. These metal chests secure multiple tools and resist weather, but they’re a fixed installation, plan on drilling into the truck bed or using bed rail mounts.
Enclosed storage keeps dust off tools and works well in shared spaces like basements or garages where a clean appearance matters. Cabinets also deter curious kids and unauthorized use, add a simple hasp and padlock for an extra layer of security.
Base cabinets with adjustable shelves accommodate circular saws along with routers, sanders, and drills. Standard kitchen base cabinets (24 inches deep, 34½ inches tall) repurposed from a remodel work fine if the interior height clears the saw body plus blade guard. Remove doors for open cubby storage, or keep them for a tidier look. Magnetic catches hold doors shut without a lock.
Drawer storage suits workshops with heavy-duty tool chests or rolling cabinets. Circular saws fit in drawers at least 6 inches deep, though 8 inches provides clearance for the blade guard without forcing it. Line the drawer bottom with foam or rubber mat to prevent the saw from sliding during drawer movement. Store extra blades in the same drawer using blade guards or a dedicated blade case, never leave bare blades loose.
One challenge with cabinet storage: heat buildup. Corded tools generate warmth during use, and stashing a just-used saw in a closed cabinet can trap moisture from temperature cycling, promoting rust. Let tools cool for 10–15 minutes before closing them in.
For shops with limited wall and floor space, overhead cabinets mounted 6–7 feet high provide storage without eating into work zones. But, lifting a circular saw overhead repeatedly increases injury risk. Reserve overhead storage for less-used tools or seasonal equipment.
Building custom storage lets DIYers tailor dimensions, material, and features to exact needs, and it’s a good way to use scrap lumber and offcuts.
Wall-mounted saw rack: Cut two pieces of ¾-inch plywood to 10×12 inches. On one piece, cut a U-shaped notch along one edge sized to cradle the saw body (trace the tool profile for accuracy). Attach a French cleat or screw directly into studs. Mount the second piece below it with a shallow lip to hold the front of the baseplate. Total material cost: under $10 if using shop scraps. Sand edges smooth to avoid snagging cords.
Rolling saw station: Build a simple cart from 2×4 framing and a ¾-inch plywood top. Add a lower shelf for blade storage and a side-mounted power strip for charging cordless batteries. Use 3-inch swivel casters (two locking) rated for at least 200 pounds total load. Dimensions around 24×36 inches provide enough surface for the saw plus a small outfeed area. Finishing with exterior paint or polyurethane protects against moisture if the cart lives in an unheated garage. This type of mobile workshop project appears frequently in DIY tool storage builds.
PVC pipe holder: For ultra-budget storage, cut a length of 4-inch PVC pipe to 14 inches, then cut it lengthwise to create a half-round cradle. Screw it horizontally to a stud, open side up, and rest the saw body in the channel. The blade guard fits inside, and the handle extends past the end. Cost: about $3 for a 2-foot section of pipe. It’s not elegant, but it works and installs in five minutes.
Under-bench sliding tray: If bench space is tight, mount a sliding drawer glide under the benchtop and attach a shallow tray (3–4 inches deep). The saw slides out for use, then tucks under the bench when done. Use full-extension ball-bearing slides rated for 100 pounds to handle tool weight without binding. Keep the tray width slightly wider than the saw baseplate to prevent side-to-side rocking.
For any DIY project, wear safety glasses when cutting and drilling. Pre-drill screw holes in plywood to prevent splitting, especially near edges. If mounting to drywall without hitting studs, use toggle bolts or heavy-duty anchors rated for the tool weight plus a safety margin. Most circular saws weigh 7–15 pounds, but dynamic loads (grabbing the tool quickly) can double the force on fasteners. Many home improvement tutorials cover proper wall anchor selection for tool storage projects.
Finish all wood surfaces with paint, stain, or sealer to resist moisture and make cleaning easier. Sawdust buildup on raw wood turns into a sticky film when humidity rises.