Phone:
(701)814-6992
Physical address:
6296 Donnelly Plaza
Ratkeville, Bahamas.
Phone:
(701)814-6992
Physical address:
6296 Donnelly Plaza
Ratkeville, Bahamas.
A cluttered craft room isn’t just frustrating, it kills productivity. When supplies are scattered across every surface, projects take twice as long and materials get damaged or lost. Craft storage bins solve this problem by creating a dedicated system where everything has a place. Whether someone’s working with fabric scraps, beads, paint tubes, or paper, the right bins transform chaos into a functional workspace. This guide covers the essential types of storage bins, how to choose the best ones for specific supplies, and practical organizing strategies that actually work. No fluff, just systems that keep creative projects moving forward.
Craft storage bins aren’t just containers, they’re infrastructure for a working creative space. Without proper storage, supplies degrade faster. Paints separate, fabrics collect dust, paper warps from humidity, and small items disappear into the void.
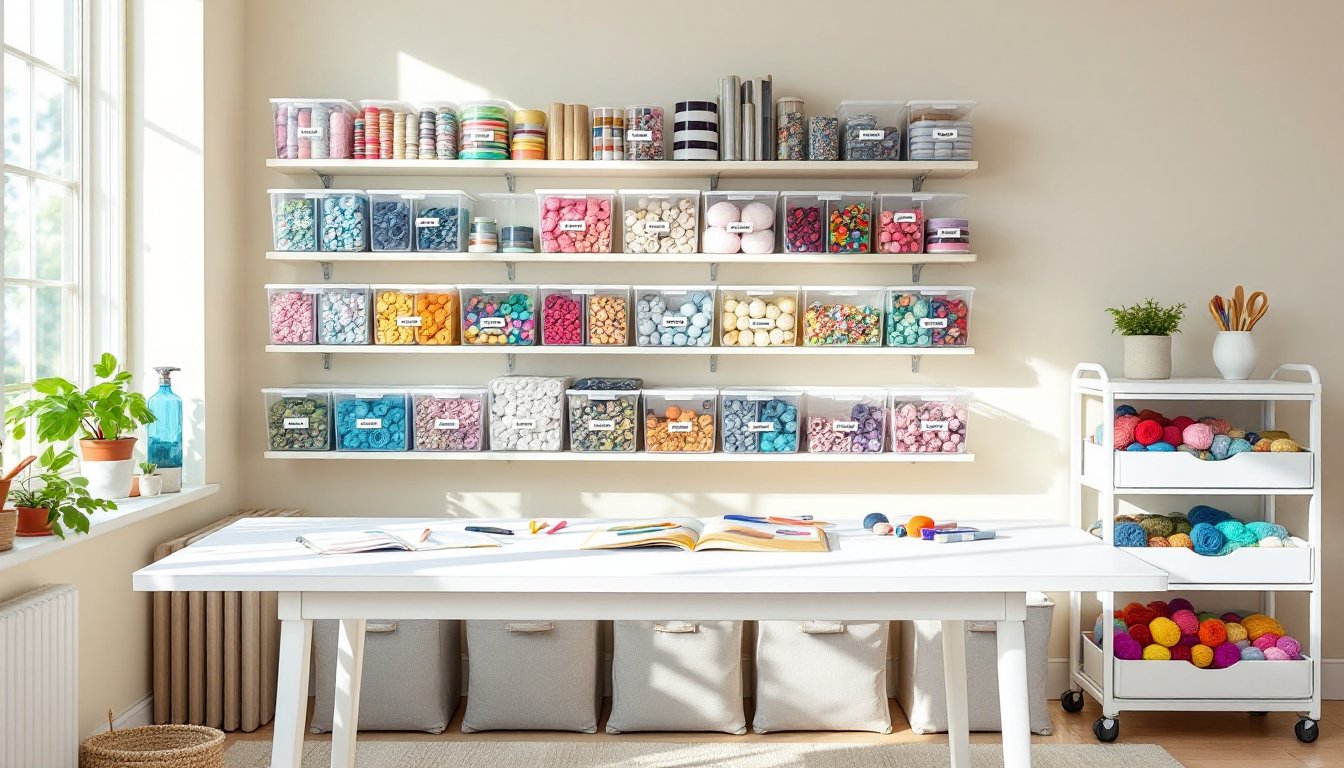
The right bins protect materials from environmental damage while keeping them visible and accessible. Clear bins let crafters see inventory at a glance. Stackable bins maximize vertical space in closets or under tables. Labeled bins eliminate the five-minute search for that one specific color of embroidery floss.
Beyond protection, bins create psychological benefits. A well-organized space reduces decision fatigue and makes it easier to start projects. When someone can pull out exactly what they need in seconds, they’re more likely to actually use their supplies instead of letting them sit unused.
For multi-craft hobbyists, bins enable project segmentation. One bin holds everything for quilting, another for scrapbooking, another for jewelry making. This containment prevents cross-contamination of materials and speeds up both setup and cleanup.
Finally, proper storage extends the lifespan of expensive supplies. Quality fabric, specialty papers, and artist-grade paints represent significant investments. Protecting them with appropriate storage bins isn’t optional, it’s basic asset management for anyone serious about their craft.
Different supplies demand different storage solutions. Matching bin types to materials prevents damage and improves workflow.
Clear polypropylene bins dominate craft storage for good reason, visibility matters. When someone can see contents without opening every container, they save time and avoid buying duplicate supplies.
Standard plastic storage bins with snap-on lids work well for bulk items like yarn skeins, fabric bolts, or paper reams. Look for bins with measurements stamped on the base, common sizes include 6-quart, 12-quart, and 28-quart capacities. A 12-quart bin measures roughly 15″ × 11″ × 6.5″ and fits perfectly on most shelving units.
For smaller supplies, modular drawer systems excel. These plastic units feature multiple shallow drawers (typically 1-3 inches deep) that stack vertically. They’re ideal for beads, buttons, ribbons, stickers, and other small components that need separation. The best models have drawer organizers with compartments that prevent mixing.
Airtight plastic containers with gasket seals protect moisture-sensitive materials like clay, chalk pastels, and water-activated paints. The gasket creates a barrier against humidity, critical in basements or garages where craft spaces often end up.
One caution: avoid cheap, brittle plastic bins. They crack when stacked, and broken corners create sharp edges. Invest in bins rated for at least 20 lbs if stacking more than two high.
Fabric bins offer flexibility that rigid plastic can’t match. Collapsible canvas bins fold flat when not in use, making them perfect for seasonal supplies or rotating project materials.
Canvas storage cubes (typically 11″ × 11″ × 11″) fit standard cube storage shelving units found at most furniture retailers. They’re excellent for fabric storage because the breathable material allows air circulation, preventing musty odors. Reinforce the bottom with cardboard if storing heavy items like yarn cones.
Handle-equipped fabric totes work well for portable project kits. Someone working on a quilt can load all fabrics, thread, and tools into one tote and carry it between sewing machine and cutting table. Look for reinforced handles that won’t tear under weight.
Felt storage bins add a premium touch with better structure than basic canvas. The thick felt holds its shape without internal support, and the material resists moisture better than thin fabric. They cost more but last years longer.
Fabric bins do have limitations. They’re not suitable for wet materials (liquid paints, glues), very small items (sequins, seed beads) that might slip through weave, or anything with sharp edges. For those supplies, plastic wins.
Matching bins to actual usage patterns prevents wasted money and space. Start with an honest inventory assessment.
Size the bins to the supplies, not the shelf. Oversized bins become junk drawers where small items get lost at the bottom. A bin should be 70-80% full when loaded, enough to justify the space but with room to retrieve items easily.
Consider access frequency. Daily-use supplies need bins that open quickly, no lids with four latches. Snap-top bins or open-front bins work best. Seasonal or backup supplies can go in lidded bins on high shelves.
Match material to environment. Basement craft rooms need moisture resistance, choose plastic with sealed lids. Climate-controlled rooms can use fabric bins. Garages with temperature swings need UV-resistant plastic that won’t become brittle.
Stack or shelve? Stackable bins maximize vertical space but make bottom bins hard to access. If storing frequently-used items, shelf-based storage systems offer better accessibility. Reserve stacking for backup inventory.
Standardize dimensions. Buying bins from the same product line ensures they nest and stack properly. Mixing brands creates gaps and instability. Measure shelf depth before buying, a standard shelf is 12″ deep, and bins should be at least 1″ shorter to avoid overhang.
Test the weight limit. Craft supplies get surprisingly heavy. Fabric bolts, jars of paint, and tool collections can exceed 15-20 lbs per bin. Check manufacturer specifications and don’t trust thin plastic with heavy loads.
Label-friendly surfaces matter. Some bins have textured surfaces where adhesive labels won’t stick. Look for smooth label panels molded into the design or bins with built-in label holders.
Finally, buy a few bins and test them before committing to an entire system. Use them for a month to identify problems, awkward size, difficult lids, poor stackability, before purchasing more.
Organization systems fail when they’re too complicated. The best setups work with natural workflow, not against it.
Color-code by project type. Assign each craft category a bin color: red for sewing, blue for paper crafts, green for painting. This creates instant visual sorting, anyone can grab the right bin without reading labels. It’s especially useful in shared craft spaces.
Create project-ready kits. Load individual bins with everything needed for one specific project. A quilting kit might include pre-cut fabric, matching thread, pattern instructions, and specialty rulers. When inspiration hits, the kit is grab-and-go ready.
Use drawer dividers inside bins. Most crafters know about small compartments for organizing supplies within larger containers. Adjustable dividers turn a single large bin into 4-6 separate sections. This works particularly well for ribbon spools, paint bottles, or marker sets that need to stay upright.
Stack vertically by frequency. Most-used supplies go at eye level (waist to shoulder height). Less frequent items go up high. Rarely-used or seasonal supplies go below knee level. This ergonomic approach reduces bending and reaching.
Label three ways. Put labels on the front, top, and one end of each bin. Front labels help when bins are on shelves. Top labels help when bins are stacked. End labels help when bins are lined up in drawers. Use a label maker with waterproof labels, handwritten labels smudge.
Carry out a one-in, one-out rule. When a bin fills completely, it’s time to use supplies before buying more. This prevents hoarding and keeps the collection manageable. Mark full bins with a colored dot as a visual reminder.
Build a mobile cart. Mount bins on a rolling cart for maximum flexibility. A three-tier utility cart holds 6-9 medium bins and moves between workstations. This setup works exceptionally well in multi-purpose rooms where the craft space shares real estate with other activities.
Use photo labels for kids or visual learners. Instead of text, attach a photo of the bin’s contents to the outside. This makes cleanup faster and helps non-readers find supplies independently.
Effective storage doesn’t require expensive specialty products. With basic materials and minimal tools, anyone can build custom solutions.
Repurpose food containers. Clear plastic takeout containers, large yogurt tubs, and coffee cans work as bin substitutes for small supplies. Clean them thoroughly, remove labels with rubbing alcohol, and add custom printed labels. They stack reasonably well and cost nothing.
Build cardboard drawer dividers. Cut cereal boxes or shipping boxes into strips 3-4″ tall and notch them together in a grid pattern inside bins. This creates adjustable compartments without buying drawer organizers. Cover with contact paper for durability.
Make fabric bins from old jeans. Cut denim legs into cylinders, sew one end closed, fold the top edge over, and add a drawstring. These sturdy bins cost nothing if using clothes headed for donation. They’re particularly good for storing yarn, ribbon spools, or fabric scraps.
Convert shoe organizers. Over-the-door shoe organizers with clear pockets become instant craft storage. Each pocket holds scissors, glue bottles, paintbrushes, or small tool sets. The vertical format saves floor and shelf space, a 24-pocket organizer can replace three shelves of bins.
Use tension rods inside cabinets. Install tension rods vertically or horizontally inside cabinets to create dividers for flat storage bins or to hold ribbon spools. This costs under $10 and makes awkward cabinet spaces functional.
PVC pipe organizers. Cut 3-4″ diameter PVC pipe into 6-8″ sections, sand the edges smooth, and mount them horizontally to a board or inside a drawer. These cylinders hold rolled fabric, vinyl sheets, wrapping paper, or large paintbrushes. A 10-foot pipe costs around $15 and creates 12-15 storage tubes.
Wrap oatmeal containers. Cylindrical oatmeal containers become custom bins with decorative paper or fabric covering. They’re ideal for storing paintbrushes upright, knitting needles, dowels, or rolled papers. Stack them on their sides in bookcase shelves.
Before building DIY solutions, calculate material costs honestly. Sometimes buying ready-made bins is actually cheaper when factoring in time and materials. DIY makes sense when customization is needed or when repurposing items otherwise destined for disposal.