Phone:
(701)814-6992
Physical address:
6296 Donnelly Plaza
Ratkeville, Bahamas.

Phone:
(701)814-6992
Physical address:
6296 Donnelly Plaza
Ratkeville, Bahamas.
Living in a campervan demands ruthless efficiency. Every cubic inch counts, and poor storage planning leads to clutter, frustration, and wasted space that could be used for gear, food, or just breathing room. The difference between a cramped metal box and a functional mobile home often comes down to how well storage is designed and executed. Whether converting a blank cargo van or upgrading an existing rig, these 15 storage solutions focus on practical, buildable ideas that work in real-world conditions, not just pretty Instagram posts.
Campervans typically offer 60-100 square feet of usable living space, depending on wheelbase and layout. That’s roughly the size of a small bedroom, yet it needs to function as kitchen, bedroom, closet, office, and garage combined.
Without intentional storage design, items end up piled on seats, shoved under cushions, or rattling around in bins that shift during travel. This creates safety hazards, loose objects become projectiles during sudden stops, and makes simple tasks like cooking or finding clean clothes unnecessarily difficult.
Effective storage in a campervan must account for weight distribution (keeping heavy items low and centered), vibration and movement (securing everything that can shift), and accessibility (frequent-use items within arm’s reach). It’s not just about fitting more stuff in: it’s about organizing what’s essential so the space remains livable mile after mile.
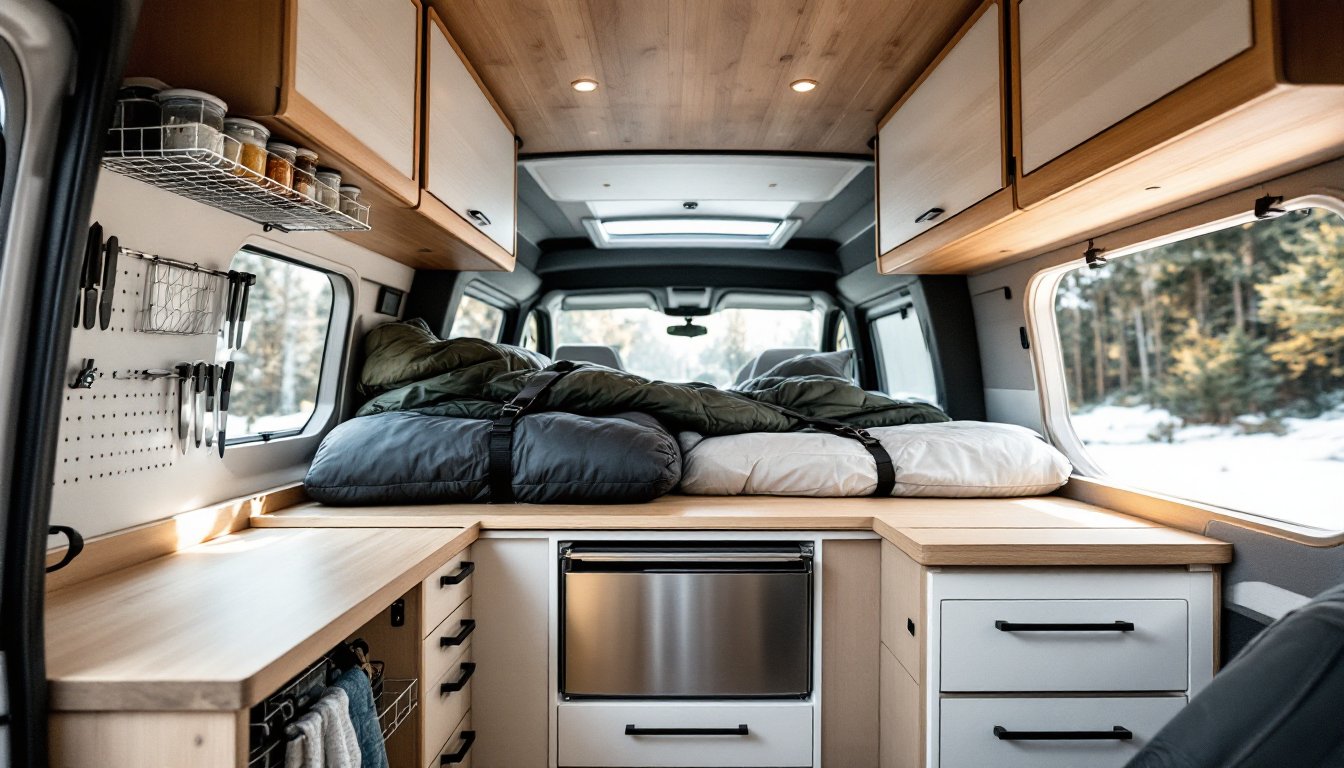
Overhead cabinets are the most underutilized space in many campervan builds. The area above the bed, along the walls near the ceiling, and over the cab offers storage without eating into floor space.
1. Mounted overhead cabinets: Use 3/4-inch plywood or lightweight 1/2-inch Baltic birch to build shallow cabinets (6-8 inches deep) along the upper walls. Secure them to wall studs or directly to metal ribs with 1/4-inch bolts and backing plates. Add magnetic or sliding latches, standard cabinet catches won’t hold during off-road travel.
2. Ceiling nets and cargo netting: Stretch bungee cargo nets or paracord netting across the ceiling to hold sleeping bags, jackets, or other soft, lightweight gear. This keeps items accessible without requiring permanent cabinetry.
3. Roof rack pass-throughs: If the van has a roof rack, cut a hatch in the ceiling (requires sealing and weatherproofing with butyl tape or Dicor sealant) to store bulky items like camping chairs or firewood overhead. This is structural work, plan around existing roof supports and consult your van’s load rating.
Weight limits matter. Overhead storage should hold light, bulky items only. Keep weight below 20-30 pounds per linear foot of cabinetry to avoid stress on mounting points and maintain a low center of gravity.
The bed platform is one of the largest horizontal surfaces in a campervan, and the space beneath it is prime real estate for storage.
4. Drawer-style storage boxes: Build rolling plywood drawers on full-extension drawer slides rated for at least 100 pounds. These allow you to access gear stored deep under the bed without crawling or unpacking everything in front. Use 1×4 or 1×6 pine for drawer boxes and 1/4-inch plywood for bottoms.
5. Lift-up bed platforms: Hinge the entire bed frame (or sections of it) using heavy-duty lid supports (also called gas struts) so the mattress lifts to reveal storage underneath. This works well for items you don’t need daily, tools, spare parts, seasonal clothing. Secure items inside with organization bins or tie-down straps to prevent shifting.
6. False floors and hidden compartments: If the van floor has ribs or depressions, build a false floor over them using 2×2 furring strips and 1/2-inch plywood, creating hidden pockets for valuables, documents, or emergency supplies. This adds minimal height but maximizes otherwise wasted space.
7. Slide-out pantry or gear trays: Install narrow pull-out trays (4-6 inches wide) along the side of the bed platform for canned goods, shoes, or tools. Use side-mount drawer slides for smooth operation even on uneven terrain.
Van kitchens are compact, but smart layouts can handle serious meal prep without clutter.
8. Magnetic spice racks and knife strips: Mount magnetic strips on cabinet doors or walls to hold spice tins, knives, and metal utensils. This frees up drawer space and keeps tools visible and accessible.
9. Sliding pantry pull-outs: Many small kitchen solutions apply directly to van builds. Install vertical pull-out pantries in narrow gaps (as little as 6 inches wide) beside the fridge or stove. Use side-mount slides and build frames from 1×3 poplar or pine.
10. Nested containers and stackable bins: Store dry goods in clear, airtight containers that nest or stack efficiently. Avoid round containers, square or rectangular shapes use space better. Label everything: when you’re digging for cumin in the dark, labels save time and frustration.
11. Collapsible and hanging solutions: Use collapsible dish racks, silicone bowls, and hanging fruit baskets (suspended from overhead hooks) to save counter and cabinet space. Frequent-use items like coffee mugs or cutting boards can hang from S-hooks on a rail or pegboard.
Keep heavy items low. Canned goods, water jugs, and cookware should go in lower cabinets or floor-level storage to maintain stability while driving.
Every piece of furniture in a campervan should earn its footprint by serving multiple functions.
12. Bench seating with storage: Build bench seats with hinged lids over storage compartments. Use 3/4-inch plywood for the frame and lid, adding piano hinges or butt hinges for durability. Cushion the top with high-density foam (at least 4 inches thick) wrapped in marine-grade vinyl.
These benches can hold tools, shoes, outdoor gear, or even a portable toilet. Make sure lid supports prevent slamming and pinched fingers, soft-close hinges or lid stays are worth the small added cost.
13. Fold-down tables and countertops: Install tables that fold flat against the wall when not in use, secured with drop-leaf brackets or folding shelf brackets. This creates workspace for cooking, working, or eating without permanently occupying floor space.
14. Modular shelving and pegboard systems: Use pegboard or slotwall panels on vertical surfaces to create adjustable storage. Hooks, shelves, and bins can be rearranged as needs change. Secure pegboard to 1×2 or 1×3 furring strips behind the panel to allow clearance for hooks.
Van life experts often emphasize decluttering strategies to ensure furniture remains functional rather than becoming a junk magnet.
Outdoor gear is bulky, dirty, and needs to stay separate from living areas.
15. Rear door and exterior storage: Mount cargo boxes, bike racks, or shovel/axe mounts on the rear doors or bumper. Use bolt-on racks rated for the weight you’re carrying. MaxxTrax, camp chairs, and awnings can mount externally with quick-release brackets.
Make sure exterior storage doesn’t block taillights, license plates, or backup cameras, this violates vehicle codes in most jurisdictions.
Wet gear storage: Dedicate a compartment near the door for wet or muddy items. Line it with vinyl flooring or a plastic tub that’s easy to rinse. Ventilation is critical: add small louvered vents to prevent mildew.
Tool and recovery gear: Store recovery straps, jacks, and tire repair kits in under-vehicle storage boxes (if ground clearance allows) or in sealed bins under the bed. Keep fire extinguishers and first aid kits within arm’s reach of the driver’s seat, not buried in a back cabinet.
For those exploring storage solutions across different living spaces, the principles of accessibility and weather resistance apply whether you’re outfitting a van, shed, or garage.
Campervan storage isn’t about cramming more stuff into a small space, it’s about designing systems that keep essential gear organized, secure, and accessible. Measure twice, build with materials that tolerate vibration and temperature swings, and don’t skip the latches or tie-downs. A well-organized van makes life on the road smoother, safer, and far more enjoyable.