Phone:
(701)814-6992
Physical address:
6296 Donnelly Plaza
Ratkeville, Bahamas.

Phone:
(701)814-6992
Physical address:
6296 Donnelly Plaza
Ratkeville, Bahamas.
A cluttered pantry isn’t just frustrating, it’s money wasted on duplicate purchases and food spoilage. Most homes have more pantry capacity than they’re using: they just haven’t applied the right organizational framework. Whether working with a walk-in closet or a shallow reach-in, the principles remain the same: maximize vertical space, group like items, and make everything visible at a glance. This guide walks through proven strategies to turn a chaotic pantry into a functional storage system that saves time and reduces waste.
An organized pantry cuts grocery shopping time and eliminates the “I thought we had that” problem. When items are visible and grouped logically, households waste less food, the average American family tosses $1,500 worth of groceries annually, much of it buried and forgotten in the back of shelves.
From a practical standpoint, good organization protects the investment. Dry goods stored properly in airtight containers last longer and resist pests. Canned goods rotated using a first-in, first-out system stay within safe consumption windows.
Beyond function, a well-organized pantry makes meal prep faster. When baking supplies are together, spices are alphabetized, and snacks have a designated zone, anyone in the household can find what they need without rummaging. It’s a small change that compounds daily.
Before buying a single bin, empty the pantry completely. This step reveals the actual dimensions, identifies damaged shelving, and forces decisions about expired or unused items.
Check expiration dates and toss anything past its prime. Donate unopened, non-perishable items that won’t realistically get used, the duplicate cans of pumpkin puree from three Thanksgivings ago, the specialty flour from a single recipe. If it hasn’t been touched in 12 months, it’s clutter.
Measure shelf depth, width, and height between shelves. Standard pantry shelves are 12 to 16 inches deep and 12 to 18 inches apart vertically. These dimensions determine which storage solutions will fit. Note any fixed shelves versus adjustable ones: adjustable shelving offers more flexibility to accommodate tall items like cereal boxes or small appliances.
Group remaining items by category on the counter: baking supplies, breakfast foods, snacks, canned goods, oils and vinegars, spices. This preview shows how much space each category requires and informs the layout.
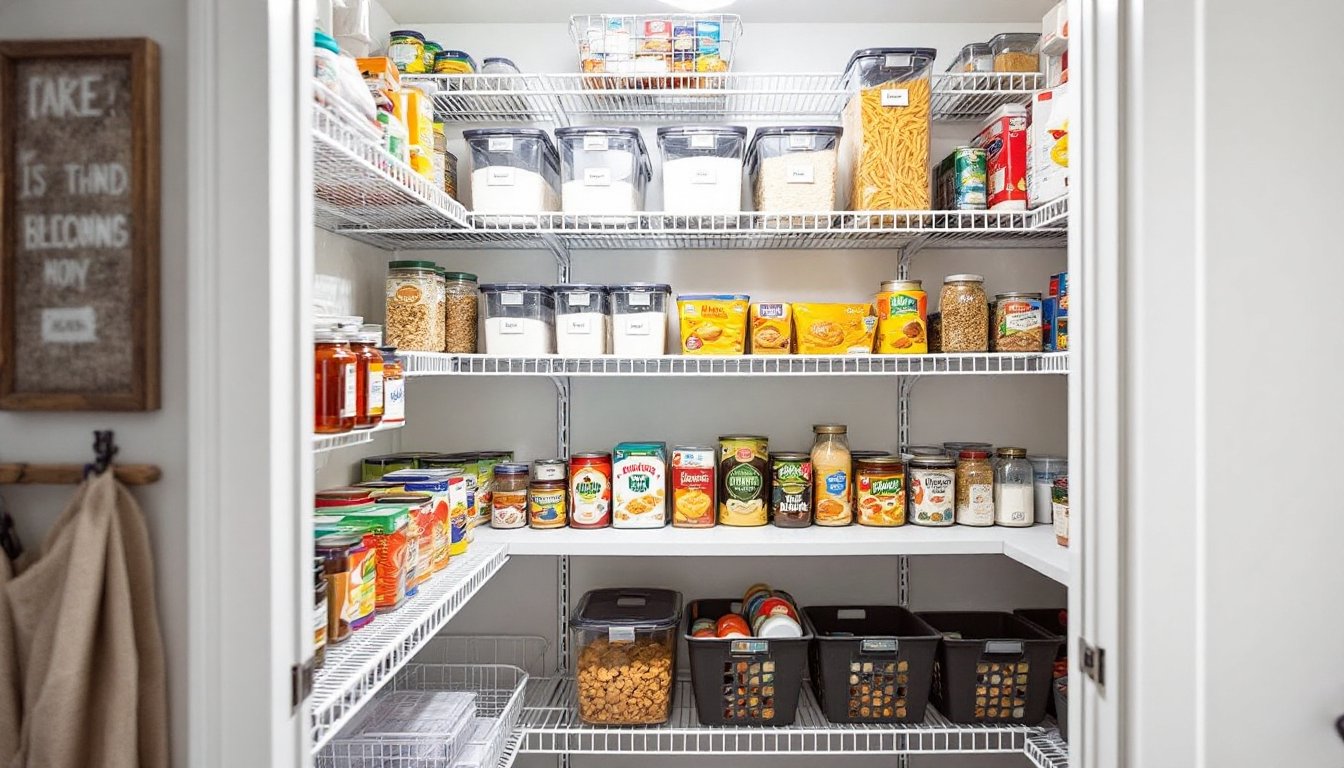
Fixed shelving wastes vertical space. The gap between a box of pasta and the shelf above it is dead air. Adjustable wire shelving or sturdy plastic-coated units allow custom spacing and typically support 50 to 100 pounds per shelf when properly installed into wall studs.
For shallow pantries (less than 12 inches deep), consider pull-out shelving or sliding drawers. These systems mount on full-extension drawer slides and bring the back of the shelf forward, eliminating the need to move front items to reach the back. Installation requires a drill, level, and mounting screws into studs or with heavy-duty drywall anchors rated for the load.
Add shelf risers to create tiered storage for canned goods and jars. A simple wire or acrylic riser doubles the effective storage on one shelf by stacking items in a stadium-style arrangement. They’re especially useful for seeing labels on shorter cans.
Lazy Susans work well in corner pantries or deep shelves. Turntables with a 12- to 18-inch diameter keep oils, vinegars, and condiments accessible without shuffling bottles. Opt for models with raised edges to prevent items from sliding off during rotation.
For walk-in pantries, consider freestanding wire rack units (often called Metro racks or NSF shelving). These commercial-grade shelves assemble without tools, adjust in 1-inch increments, and hold significant weight. A standard 4-shelf unit measuring 48 inches high, 18 inches deep, and 36 inches wide costs $80 to $150 and provides restaurant-level storage capacity.
Clear airtight containers serve two purposes: they keep food fresh and make inventory visible at a glance. Transferring dry goods like flour, sugar, rice, and pasta into containers with silicone-sealed lids protects against humidity and pantry moths.
Choose square or rectangular containers over round ones, they nest together without wasted space. Look for BPA-free plastic or borosilicate glass, both dishwasher-safe. Standard sizes include 2-quart containers (holds a 5-pound bag of flour), 4-quart (a box of cereal), and 12-quart (25 pounds of dog food).
Consistent container lines streamline restocking and create a uniform appearance. Mixing shapes and brands leads to inefficient stacking. If budget allows, modular systems from one manufacturer maximize space utilization because they’re designed to stack and nest.
For items that don’t need airtight storage, like snack bags, seasoning packets, or tea, use clear plastic bins with handles. Measure shelf depth before buying: a bin that’s too deep will hang over the edge, and one too narrow wastes space. A 10-inch-wide bin fits two snack boxes side by side: a 6-inch bin works for smaller items like seasoning packets.
Avoid decorative baskets for pantry use unless visibility isn’t a priority. Woven baskets look appealing but hide contents and collect dust. If aesthetics matter, reserve them for less-used items on top shelves.
Lazy Susan turntables in bins keep small jars and bottles organized. An 11-inch turntable fits inside most standard bins and is especially helpful for families who’ve adopted various pantry organization strategies involving condiment rotation.
Labels eliminate guessing games and help household members maintain the system. Use a label maker for a clean, professional look, or print on adhesive labels if working with textured surfaces.
Label containers with the contents and purchase or expiration date. For bulk items like rice or oats, note the month and year to track freshness. Flour typically lasts 6 to 8 months: whole grains go rancid faster due to oils.
For shelves and bins, add labels to the front edge indicating categories: “Baking,” “Breakfast,” “Pasta & Grains,” “Snacks.” This keeps items corralled in their zones and prevents the gradual drift into chaos.
Some households benefit from a simple inventory list, especially those who buy in bulk or have dietary restrictions. A whiteboard mounted inside the pantry door or a shared note on a smartphone works. List items as they’re added and cross them off when used. This prevents duplicate purchases and streamlines grocery lists.
Rotate stock using FIFO (first in, first out), the same method grocery stores use. Place new purchases behind older items so the oldest gets used first. This matters most for canned goods, which have a 1- to 5-year shelf life depending on acidity and type.
Most pantries underutilize vertical space and the back of the door. Simple additions capture this wasted capacity without major construction.
Mount an over-the-door rack with adjustable shelves or pockets. These racks typically hold spices, snack bars, or cleaning supplies. Ensure the door can still close fully and that the rack doesn’t interfere with shelving on the opposite wall. Weight capacity varies, cheaper models hold 10 to 15 pounds, while heavy-duty versions handle 40+ pounds when mounted with screws into the door rather than hanging from the top edge.
Add hooks or small baskets along the door’s interior for reusable shopping bags, kitchen towels, or aprons. Command hooks work for renters: for permanent installations, use screw-in hooks rated for 5 to 10 pounds each.
Inside the pantry, install tension rods between shelves to create dividers for baking sheets, cutting boards, or serving platters. Adjustable spring-loaded rods (the type used for shower curtains) fit snugly without drilling and prevent flat items from tipping.
Stackable can organizers or can dispensers maximize vertical space for canned goods. Gravity-fed dispensers load from the top and dispense from the front, automating FIFO rotation. They work best for households that buy multiples of the same canned item.
For awkward corner spaces in walk-in pantries, corner shelves or rotating corner units capture dead zones. These range from simple wire triangles that hang from existing shelves to custom lazy Susan towers that spin to bring items forward.
Many homeowners draw inspiration from sources like The Kitchn when planning kitchen storage upgrades, since maximizing space in food storage areas is closely tied to overall kitchen functionality. Similarly, comprehensive organizational approaches found on platforms like Martha Stewart emphasize the importance of systematic decluttering and zoning for long-term maintenance.
An organized pantry isn’t a weekend project that stays perfect forever, it requires light maintenance. Set a reminder every quarter to check expiration dates and wipe down shelves. Adjust zones as needs shift: a household with young kids might need more snack space, while serious bakers require more room for specialty flours. The systems outlined here are adaptable, not prescriptive. Start with the biggest pain point, carry out one solution at a time, and tweak until the pantry works for the household’s actual habits.