Phone:
(701)814-6992
Physical address:
6296 Donnelly Plaza
Ratkeville, Bahamas.

Phone:
(701)814-6992
Physical address:
6296 Donnelly Plaza
Ratkeville, Bahamas.
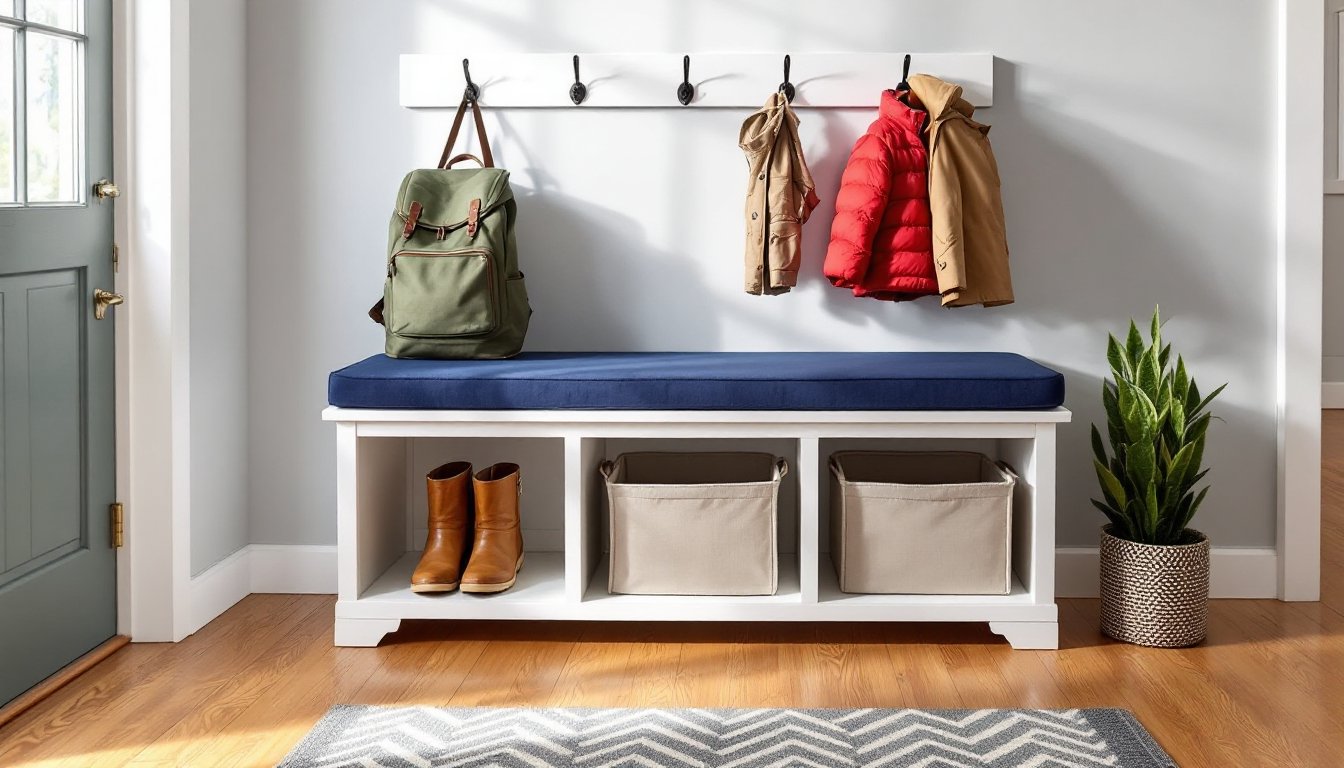
An entryway turns into a dumping ground fast, coats piled on hooks, shoes kicked under consoles, bags cluttering the floor. A built-in bench with storage fixes that chaos by anchoring the space with purpose-built function. Unlike freestanding furniture that wobbles or leaves gaps, a built-in bench integrates seamlessly with the wall, maximizing every inch while handling the daily wear of a busy household. This guide walks through planning, materials, construction, and finishing for a custom entryway bench that looks professionally installed, because the homeowner built it that way.
Built-in benches solve three problems at once: seating, storage, and visual cohesion. They anchor an entryway without eating up floor space the way standalone benches do, and they can be designed to fit awkward nooks or span entire walls.
From a construction standpoint, built-ins are more stable than furniture. By fastening directly to wall studs, the bench won’t shift, tip, or leave scuff marks on baseboards. Storage cubbies, drawers, or lift-top compartments keep gear organized and out of sight, critical in homes without mudrooms or coat closets.
Built-ins also add perceived home value. Buyers notice integrated storage solutions, especially in high-traffic areas. A well-finished bench reads as part of the architecture, not an afterthought. For DIYers comfortable with basic carpentry and finish work, this project delivers professional results at a fraction of the cost of hiring a carpenter, typically $200–$500 in materials versus $1,200+ for custom millwork, depending on size and finish.
Start by deciding what the bench needs to do. Shoe storage? Coat hooks overhead? Cubbies for backpacks? The answers shape the design. Sketch a rough elevation view showing bench height, depth, and storage layout.
Bench height should be 16–18 inches for comfortable adult seating. Kids can use lower benches, but 18 inches is the sweet spot for most households. Depth typically runs 16–20 inches, enough to sit without knees jutting out, but shallow enough to leave walkway clearance. Measure from the back wall to the opposite wall or doorway: leave at least 36 inches of clearway for traffic flow per IRC guidelines.
Locate wall studs with a stud finder and mark them. The bench frame will anchor to these. If the space has baseboard heaters, electrical outlets, or HVAC vents, plan cutouts or relocate components, this may require an electrician or HVAC tech.
Load considerations: A standard bench should support at least 250 pounds per seated person. Use 2×4 framing anchored into studs with 3-inch structural screws, not drywall anchors. If building over a vent or radiator, consult local codes: some jurisdictions prohibit blocking HVAC airflow.
Sketch the storage layout. Open cubbies are easiest: vertical dividers create slots for shoes or bins. Drawers add complexity but maximize hidden storage. Lift-top seats work well for seasonal gear like hats and gloves. Keep in mind that drawer slides and hinges add to the material list and build time.
Materials:
Tools:
Safety gear: Safety glasses, hearing protection, and a dust mask (N95 or better) are non-negotiable when cutting and sanding. Use gloves when handling rough lumber.
Many of these step-by-step woodworking plans include detailed cut lists and diagrams that simplify material ordering and reduce waste.
1. Build the base frame. Cut 2×4s to create a rectangular frame that matches the bench footprint. Use a front rail, back rail, and cross supports every 16–24 inches. Fasten with 3-inch screws and wood glue. Check for square by measuring diagonals, they should match.
2. Anchor the frame to the wall. Position the frame against the wall, leveling it side-to-side and front-to-back. Screw through the back rail into wall studs at each stud location. Use at least two screws per stud. If the floor is uneven, shim under the front rail to level the frame before fastening.
3. Add vertical supports. Install 2×4 vertical posts at each end and at cubby dividers. These posts run from the base frame to the underside of the seat. Toe-screw them into the base frame and secure tops with cross braces. Space dividers 12–16 inches apart for shoe cubbies, wider for bag or basket storage.
4. Install the seat deck. Cut 3/4-inch plywood to fit the top of the frame. If using solid wood boards (like 1×12 poplar), arrange them with tight joints and fasten from underneath with 1-1/4-inch screws into the frame. Leave a 1/8-inch gap at the wall to allow for expansion. The seat should overhang the front edge by 1–1.5 inches for a finished look.
5. Add side panels and trim. Cut 3/4-inch plywood or solid boards for the end panels. Attach with glue and brad nails. If the bench is open underneath, consider adding a toe kick (a recessed base strip) for a built-in appearance, typically 3–4 inches high, recessed 3 inches.
6. Install back panel (optional). If the wall behind the bench is unfinished or if creating closed storage, cut 1/4-inch plywood to fit and nail it into the vertical supports. This isn’t structural, it just encloses the back.
7. Build and install cubby dividers or drawers. For open cubbies, cut vertical dividers from 3/4-inch plywood and fasten them to the base and underside of the seat using glue and brad nails. For drawers, mount full-extension drawer slides to the frame sides and drawer boxes. Measure carefully, drawer slides need precise spacing. If attempting drawers for the first time, many builders find guidance on detailed DIY tutorials helpful for getting the tolerances right.
8. Fill, sand, and prep. Fill all nail holes and seams with wood filler. Let dry, then sand with 120-grit, then 220-grit. Wipe down with a tack cloth or damp rag to remove dust.
Permit note: Most built-in benches are considered non-structural cosmetic improvements and don’t require permits. But, if electrical outlets need relocating or HVAC ducts are modified, permits and licensed trades may be required. Check with the local building department.
Open cubbies are the simplest option: vertical dividers create slots for shoes, boots, or baskets. Size cubbies to fit standard storage bins (12×12 or 13×13 inches are common). Label bins or add chalkboard paint to cubby fronts for a family command center vibe.
Drawers maximize hidden storage but require drawer boxes, slides, and fronts. Use 1/2-inch Baltic birch plywood for drawer boxes, it’s stable and easy to work with. Full-extension slides (like Blum Tandem or budget-friendly Liberty D80618C) allow full access. Build drawer boxes 1 inch narrower than the opening to accommodate slides.
Lift-top seats turn the bench surface into a toy chest or seasonal storage. Use continuous (piano) hinges for even support across the lid. Add soft-close lid supports to prevent slammed fingers, especially important in households with kids.
Hooks and coat racks above the bench keep outerwear off the seat. Mount a 1×4 or 1×6 board to the wall studs above the bench, then screw in coat hooks every 6–8 inches. Use heavy-duty hooks rated for 20+ pounds if hanging winter coats or backpacks.
Cushions add comfort and style. Cut 2-inch high-density foam to match the seat, wrap it in fabric, and secure with hook-and-loop tape or upholstery tacks. For easy removal and washing, use a slipcover or tie-on cushion.
Charging stations: Drill a 1-1/2-inch hole through the back of a cubby or drawer, feed a power strip cable through, and plug it into a nearby outlet. This keeps phone and tablet charging tidy and contained. Make sure cords don’t pinch in drawers, use a grommet or edge guard on sharp plywood edges.
For those seeking free entryway bench plans with integrated hooks and shelving, several designs incorporate overhead storage that doubles as a coat rack.
Painted finishes are the most forgiving and allow use of mixed materials (plywood sides, poplar face frames). Start with a stain-blocking primer like Zinsser BIN or Kilz Original, it seals knots and wood tannins. Roll or brush on one coat, let dry, then sand lightly with 220-grit. Apply two coats of latex semi-gloss or satin paint. Semi-gloss is easier to wipe clean in high-traffic areas. Expect one gallon to cover 350–400 square feet, so a single gallon handles most benches with material left over.
Stained finishes showcase wood grain but require higher-grade lumber (oak, maple, or cherry). Sand to 220-grit before applying stain. Use pre-stain wood conditioner on pine or poplar to prevent blotching. Apply stain with a foam brush or rag, wipe off excess after 5–10 minutes, and let dry per manufacturer’s instructions. Seal with three coats of oil-based polyurethane (satin or semi-gloss), sanding lightly between coats with 320-grit. Water-based poly dries faster but may raise grain, test on scrap.
Hardware choices affect both function and style. For drawers, use undermount or side-mount slides depending on the aesthetic. Knobs or pulls should be centered on drawer fronts, typically 2–3 inches from the top edge. Drill pilot holes to prevent splitting. For lift-top seats, install lid supports (Rockler or Blum make reliable models) to prevent slamming. Hinges should be heavy-duty, especially on large lids, use at least two hinges rated for the lid’s weight.
Touch-up and final inspection: Once the finish cures (24–48 hours for paint, 72+ for poly), inspect for drips, rough spots, or missed nail holes. Touch up as needed. Install any cushions, baskets, or bins. Test drawers and lids to ensure smooth operation. The bench is now ready for daily use, built to handle the wear of a real entryway, not just look good in photos.